Configuring tactics and tracking
In the Tactics & Tracking section of a campaign, you create tactics and define your call(s) to action, then build trackable URLs for those tactics to attribute response activity in your Campaign Reporting.
For example, if your campaign has a form to sign up to receive more information about a specific topic, messaging can be sent via various channels promoting the form - and creating the tracking URL for each tactic supports campaign attribution. This data can then be used to see which channel is most effective at reaching individuals and influencing their behavior (complete and submit the form).
Once the call(s) to action has been defined and the channels promoting it to consumers identified, it's time to create the trackable URLs.
In this article you'll learn about the fields used to create the unique URLs and what each requires to ensure campaign reporting provides the metrics you need to determine the impact of your campaign in the market.
Get started
All work associated with Tactics and Tracking begins in each specific campaign (created/accessed in Campaign Workflow). Click the Overview tab and then Tactics & Tracking, which will scroll automatically down to that section. Then it's as simple as completing 2 parts:
Part 1: Define your campaign tactic and call to action
You'll enter information about the tactic (these details are not used for tracking, but help you and other users easily reference each tactic associated with the campaign).
- Tactic Name
- Enter free-text for the name of the tactic. Give the tactic a meaningful name that, at a glance, can inform you and other users of its purpose at a later time.
- Tactic Description
- Optional. Enter free-text with more details about the tactic for future reference.
- Call-to-Action
- URL (for Landing Page or Entry Form): Enter the URL (e.g., www.yourhealthsystem.com) for a landing page/microsite or entry form you’re directing campaign contacts to.
- Destination Phone Number (Optional): Enter a phone number (including area code) you want campaign contacts to call.
![]()
Part 2: Configure response tracking for your campaign channels
Then you'll enter the values for each field (the platform uses this information to generate properly formatted tracking URLs to place in your marketing messages) and generate a unique trackable URL for each channel/source you're using in the campaign.
Required parameters
To generate a URL, you must input all of the following:
- channel
- source
- agency
To successfully attribute to a campaign, you must input all of the following:
- channel
- campaignid
- tacticid
- trackingsetid
Parameter definitions
- Channel and Source
- Ignite Growth Platform supports a wide range of marketing channels and related sources that direct the campaign’s contacts to your landing page/form*. Use the dropdowns to make your selections (view available channels and sources here).
- Source External ID (Optional/Not currently reportable)
- Previously, when Google AdWords was selected as the source, adding the Source External ID provided reporting on Impressions, Reach, and Awareness Conversions in Ignite Growth Platform. However, Google Adwords data ingestion is not supported in Ignite Growth Platform; Impressions and Reach metrics will be available only in Google Analytics.
- It is still critical to include digital channels in Tactics & Tracking to ensure accurate channel attribution and downstream reporting for leads and visits. By entering the Source External ID, you can quickly view in the platform which Source ID the channel is associated with, but this is optional and won’t impact reporting.
- Agency
- Choose the entity acting as a marketing agency for the tactic.
- Ignite Growth Platform
- Client
- Other
- Choose the entity acting as a marketing agency for the tactic.
- URL
- Enter the destination URL (e.g., www.yourhealthsystem.com) for a landing page/microsite or entry form to direct the campaign’s contacts to.
- URL with Parameters
- Click the Generate button to populate this field with a properly formatted URL with parameter/value pairs. If you change any one of your selections after you have generated the URL, the existing URL is automatically cleared in this field and you need to regenerate the URL with UTM.
![]()
- Optional parameters
- Click to expand the 3-dot menu and select Additional URL Parameters to specify optional values to add to your trackable URL.
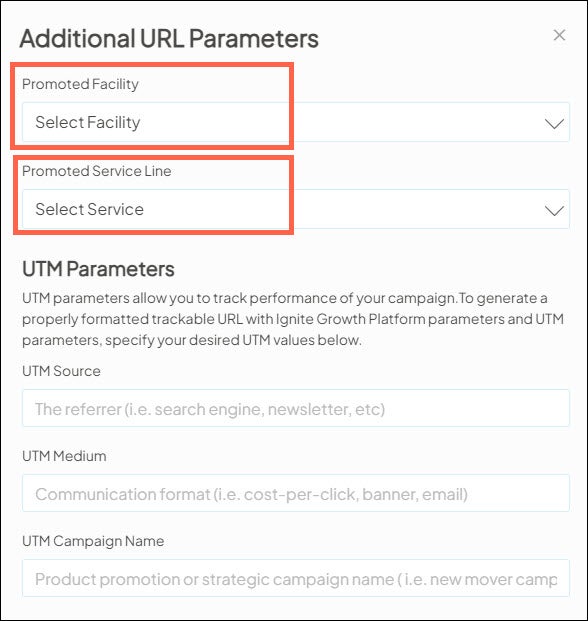
- Promoted Facility
- Select the facility for which you plan to use the trackable URL.
- Promoted Service
- Select the service line you plan to use this trackable URL for.
- UTM Source
- Enter the referrer (e.g., search engine, newsletter).
- UTM Medium
- Enter the communication format (e.g., cost-per-click, banner, email).
- UTM Campaign Name
- Enter what is being promoted by the campaign (e.g., new mover campaign).
- UTM Term
- Enter any paid keywords for the campaign.
- UTM Content
- Describe the interface item (e.g., banner ad, text link) your audience physically clicks.