Best practices
Whether you're a new user or just looking for fresh tips, our experts have you covered. Browse below for simple ways to get the most from your platform.
Market Planner Insights
As part of your platform's built-in analytics, the Service Line Assessment (SLA) helps you evaluate service lines by volume, demographics, and financial impact, so you can prioritize those with the greatest growth opportunity. Use these trainer-approved tips to get more from your tool.
Think linear
To answer a specific question, you can easily jump between the 3 reports—Market Insights, Service Line Insights, and Target Insights—but generally, we recommend using them in a straight line. This gives you the full story, from which service lines to focus on to the people using them and why.
Share your insights
With the SLA, you can share your full report or parts of it with service line leaders and other colleagues who may not have access to your solution. Just click the Download icon in the top right of your screen and choose your file format.
Get hyperlocal
Use the map dashlet in Market Insights for a visual view of areas that are growing or losing volume by ZIP code, then take those insights to refine your campaign targeting.
Audience Insights
Your solution makes it easy to create and refine your audience, but are you maximizing its targeting capabilities? Here are 3 finer features to leverage, using a mammography campaign as our example.
Use diagnosis and procedure codes to exclude sensitive people
Remove those who may find the message irrelevant or offensive; in this case, anyone who’s been diagnosed with breast cancer or had a mastectomy.
Use the radius filter for hyperlocal marketing
When defining your geography, click Set Center Point, choose a location on the map—for our example, a breast imaging center—then select the radius (1 to 45 miles) around that center point to target nearby consumers.
Cap your list to match your budget
If you’re using direct mail to drive mammogram appointments, but your target audience exceeds the number of mailers you’ve allotted, you can cap your list. When you create your mail list, click the Cap List? dropdown, select Cap Overall Audience, then enter the cap number.
Keep these tricks in mind when refining your target audience.
Let inclusions do the work
When you add your inclusions—say for Commercial and Medicare payors—you don’t then also need to add exclusions for other criteria in that category (Medicaid, Self, etc.). Your platform automatically excludes them for you—time and effort saved!
Use your criteria combinations
Within an audience group, the criteria logic is AND. If you need more targeting flexibility, click New Criteria Group to add OR logic. So, you could target a group by age and market area and who have “good” insurance…OR those without private insurance, but with a high income that has good potential for reimbursement.
Get more accurate counts
If you’re making an email only audience list, be sure to add Channel Availability from the Communications criteria, and select Email (vice versa for Direct Mail). This will give you a better idea of your audience size before downloading or syncing.
You usually have a good idea of what criteria to include when building your target audience. Knowing what to exclude is a bit trickier—but can be just as critical to your marketing efforts. Here’s a common use case, leveraging Encounter criteria in a mammography campaign:
Use Service Line to exclude sensitive people
First let’s remove those who may find the message irrelevant or offensive; we don’t want to promote screenings to anyone diagnosed or treated for cancer. So, we’ll exclude by Oncology & Hematology.
Refine with nested criteria
Now we’ll layer in Discharge Date (in this example, between 0 to 11 months) to exclude patients who’ve had oncology visits within the last year. That way, we can remove recent encounters, while still reaching those who may have been treated for cancer years ago and are now re-eligible for a screening.
Be as broad or specific as needed
Instead of the overall Service Line, we could choose to exclude by the Sub-Service Lines of Breast Cancer and Breast Cancer Screening. This ensures we’re not messaging anyone who’s been seen specifically for breast cancer or had a mammogram. We can even exclude by Diagnosis and Procedure codes; Ignite Growth Platform offers that complete targeting flexibility.
When creating your audience, the map view gives you 3 ways to include individuals based on their geographic location. Here’s how to leverage each option to navigate the terrain and find your ideal targets.
Select an area
- How to use: Choose predefined geographical areas by either Market Area or Postal Code to include people who live within them.
- When to use: To visualize the primary/secondary/tertiary service areas defined by your health system. It also allows you to easily view and target specific postal codes.
Draw custom
- How to use: Draw a polygon of any size to include people who live within that outlined area and/or exclude people outside the area.
- When to use: To target a specific area based on highways, bodies of water, or other landmarks that may impact access to care; for example, everyone who lives north of I-74 but south of I-275 based on construction detours.
Set centerpoint
- How to use: Pick a spot on the map as the center of your area, then set the number of miles around the spot to include individuals who live within that radius.
- When to use: To drive traffic to a specific facility, like a new primary care clinic. Knowing not everyone in your market will travel there for care, you can get hyper-local with your targeting.
What to do when both home AND mobile telephone numbers are SMS enabled
Our best practice is to choose the validated mobile phone number over the validated home phone instead of sending texts to both or selecting the home phone number over the validated mobile phone number. It's important to also instruct your SMS vendor about which number to use and when so your message makes it to the recipient(s) and you also want to avoid over-texting the same message multiple times to the same person on different numbers.
Below is a high level overview of the recommended steps to follow when creating a campaign that applies a predictive model to its audience:
- Define campaign objective(s) and success metrics.
- Be explicit about whether you are driving acquisition, retention, clinical screening, or awareness.
- Be explicit about whether you are driving acquisition, retention, clinical screening, or awareness.
- Research available models - use Model Selector or review the model catalog.
- Choose one model per audience.
- Map each campaign audience to one clear model matching the objective.
- Map each campaign audience to one clear model matching the objective.
- Decide whether to union audiences.
- If you need combined reach or want to pool consumers and patients, union the audiences but keep their models separate.
- If you need combined reach or want to pool consumers and patients, union the audiences but keep their models separate.
- Set score thresholds and balance sizes.
- Adjust score ranges to reflect market share and desired concentration in primary vs. secondary areas.
- Adjust score ranges to reflect market share and desired concentration in primary vs. secondary areas.
- Verify applicable criteria and deduplication.
- Check for incompatibilities or zero-size warnings and understand how fully mastered records will be prioritized.
- Check for incompatibilities or zero-size warnings and understand how fully mastered records will be prioritized.
- Launch a test.
- Run small A/B tests or audience-group breakouts to validate lift before scaling.
- Run small A/B tests or audience-group breakouts to validate lift before scaling.
- Monitor, iterate, and document.
- Track core KPIs, refine score ranges, or swap models as data indicates.
Predictive risk model best practices
- Sub-service line campaign example - Behavioral health patient outreach:
Target the behavioral health sub-service line with a single patient-risk model to keep your audience focused and measurable. If you need broader awareness, create a separate consumer audience, applying a single consumer model and union it with the patient audience using a single patient-risk model only for delivery.
- Regional rollout — Best practice:
Tailor the audience mix by region: weight audiences using a patient-risk model more heavily in primary service areas, and increase the consumer-risk model audience share in secondary and tertiary service areas. Adjust score cutoffs regionally (tighter for primary patient targeting, looser for broader consumer reach) and monitor results so you can rebalance proportions based on actual market performance.
- Multi-goal campaign — Best practice:
Map each campaign objective to its own model and audience (e.g., Model A for acquisition, Model B for retention). Run the audiences separately for measurement and only union them when a specific placement requires combined reach; this preserves clear attribution and lets you optimize budget and creative by model-level performance.
Campaign Workflow
When it comes to campaign performance, you can’t understand true ROI without also including your costs. Use these tips to account for all your investments in the Cost Schedule and maximize your out-of-the-box reporting.
Log costs you don’t have
You may have direct mail and email expenses covered in-house, like your own printer or on-staff copywriter. But, you still have to include costs for those channels to calculate ROI and incremental revenue. In those cases, add these numbers as a best practice to fill in the gaps:
- $0.55 for direct mail (per mail cost type)
- $0.05 for email (per email cost type)
When building your campaigns, keep these important actions in mind to fully capture performance—and celebrate your success!
Enter Date Sent
For direct mail campaigns, if you don’t see reporting metrics in your Campaign Dashboards & Reports tabs, make sure to add the Date Sent (date the mailer went out). This date will trigger audience response tracking, and reporting will then appear in the tabs.
Integrate Campaign IDs before activating campaigns
Prior to launch, add your Campaign IDs to your marketing automation to ensure full activity reporting (open rates, clickthroughs, unsubscribes, etc.). Be careful not to integrate Email IDs; only Campaign IDs have that data connection back to your platform.
Add tracking for every tactic
If you want to see web page activity and pageviews to track engagement, be sure to create a tactic for each URL/web page link in your email. In Tactics & Tracking, paste the URL in Web Tracking and click Generate. Copy the URL with Parameters links and drop them into your email. This will allow web activity reporting in your campaign metrics.
Marketing automation
Your application’s integration with Eloqua does the heavy lifting for your email campaigns. But don’t forget these best practices to keep your automation working right.
Integrate Campaign IDs before activating campaigns
Prior to launch, add your Campaign IDs to ensure full activity reporting (open rates, click-throughs, unsubscribes, etc.). Be careful not to integrate Email IDs; only Campaign IDs have that data connection back to your application.
Filter your segments
Eloqua will not send to unsubscribes or hard bouncebacks, but use the filters below for each segment to ensure the most accurate contact counts.
Use our form templates for tracking
Always start with WebMD Ignite-supplied templates since they contain hidden fields needed for attribution. These fields work with the capture script and query parameters to track where users are engaging.
Use these Eloqua best practices for each step along the way.
Segmenting: Add inclusion filters
Seeing email reports with high undeliverables or bouncebacks? Just apply those filters to your segments. Including those marked as Not Marked as Hard Bouncebacks and Globally Subscribed will give you more accurate counts. Make sure both inclusions say “as of now” and not a specific date.
Building: Give some time
Setting up a multi-step campaign is a great way to interact with your patients on a journey. If you’re having the campaign review an action someone took (like opening the email), be sure to give them time to complete that action by adding a Wait step before it.
Reporting: Check your success
Eager to see how your efforts are performing in-market? For detailed reports on your campaigns and emails, head to Orchestration > Campaigns then, in the classic view, click the "Reporting and Dashboards" tile; or, in the Redwood Experience view, click the More Actions dropdown menu and choose "View Campaigns Dashboards". Start with Campaign Analysis Overview and Email Analysis Overview, which shows you opens, clickthroughs, total delivered, and more.
Organization is key when it comes to managing content in Eloqua. Whether emails, segments, components, or campaigns, you can easily set up folders for accessing what you need, when you need it.
Folder Hierarchy
Folder hierarchies can be created to organize content by date, type, etc. For example: You have a folder for Images, and want to create a sub-folder for the Orthopedics service line, and then another subfolder within that for hospital or clinic images.
Campaigns
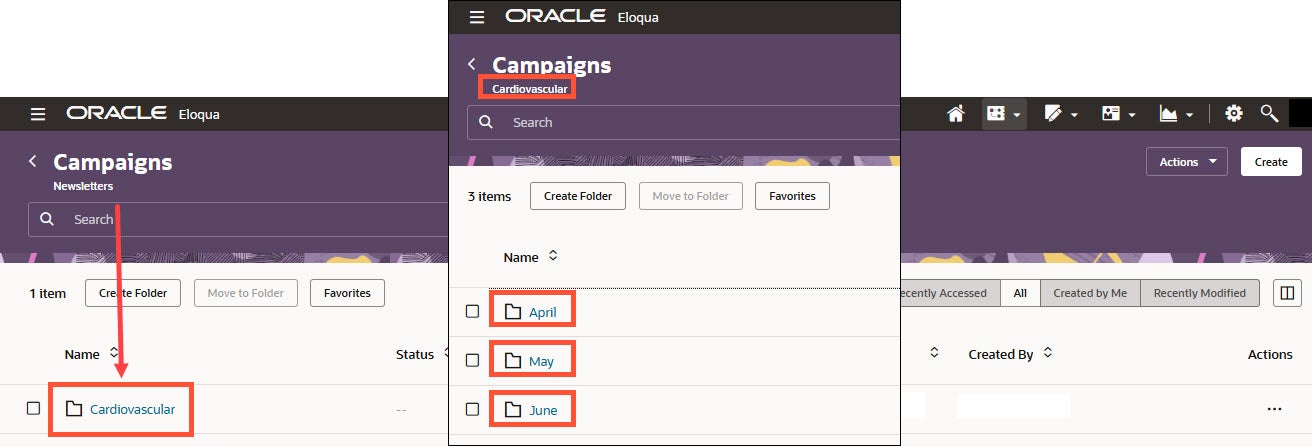
Campaigns can be organized in many ways. Think about how you would like to organize campaigns and whether or not you want to use a folder hierarchy. Example: You have a monthly cardiovascular newsletter, so you create a "Newsletter" folder and then a "Cardiovascular" folder within that, and then additional folders within Cardiovascular for each month:
- Newsletter
- Cardiovascular
- April
- May
- June
- Cardiovascular
Segments
Segments can be organized into folders whether you upload an external list to Segments or if you sync an audience directly from Ignite Growth Platform.
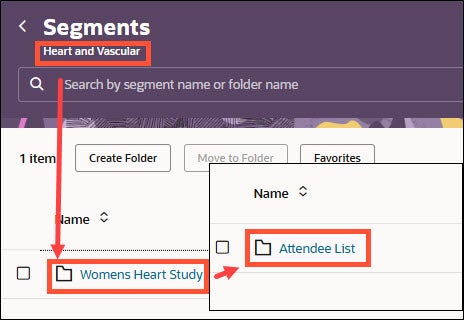
Example: You have "Heart and vascular", "Womens", and "Oncology" campaign segments. You can create a folder structure as shown below to keep segments for different campaigns organized.
- Campaigns
- Heart and vascular
- Womens Heart Study
- Attendee List
- Womens Heart Study
- Women
- Events
- OBGYN
- Anchorage
- Soldotna
- Oncology
- Prostate Cancer
- Lung Cancer
- Heart and vascular
Example: There are segments for each service line email messaging being sent, below you can see how you can organize these segments.
- Service Line
- Cardiology
- Electrophysiology
- Orthopedics
- Knee
- Hip
- Back
- Bariatrics
- Surgery
- Seminar
- Cardiology

Emails
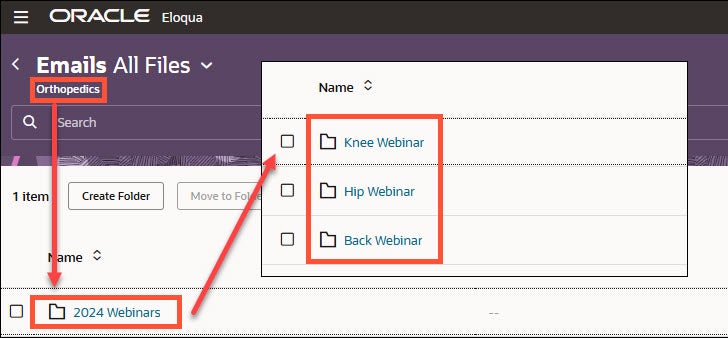
Emails can be organized with folder hierarchies.
Example:
- All
- Orthopedics
- 2024 webinars
- Knee Webinar
- Hip Webinar
- Back Webinar
- 2024 webinars
- Orthopedics
Components
As you begin components In each of the component folders, consider how to organize folders that will store these components. You should define folders in a way that makes them easy to find.
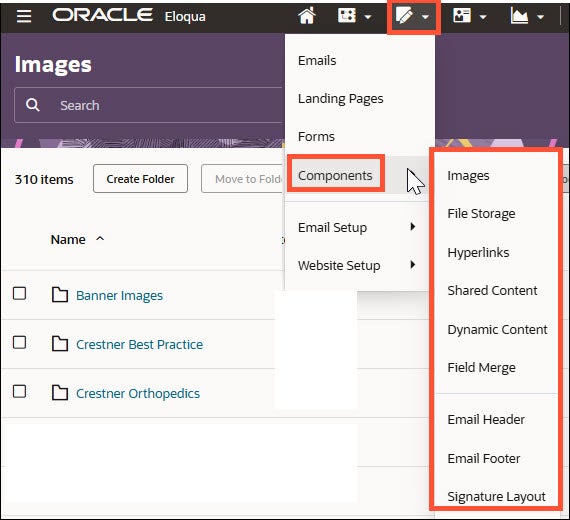
There are folders for each type of component that can be built out further:
- Images: Store images so they can be used across campaign assets.
- Files: Store links to landing pages. Store files like whitepapers, or HTML resources like scripts or stylesheets.
- Hyperlinks: Store links to landing pages.
- Shared content: Store reusable content snippets that can be used in emails and landing pages.
- Dynamic content: Store reusable content for emails and landing pages that can be changed based on the contact, account, custom object, or event.
- Field merge: Store field merges that allow you to pull data from the Eloqua database and insert it into a campaign asset. For example, you can use a field merge to personalize emails.
- Email headers and footers: Store email header and footer sections for use within emails.
- Signature layouts: Create templates for inserting sender information into emails.
Using files from the Component Library
Once you’re ready to use images and other components, they’ll be available in the library.
There is also the option to add images as you are building an email and save in the appropriate folder.

It’s best to size the images prior to adding to the images folder in Eloqua.
Email layout Image sizes:
- 1 column - 600px
- 2 column - 300px
- 3 column - 200px
- 4 column - 150px
- 2 column - left sidebar 200px and 400px
- 2 column - right sidebar 400px and 200px
Your campaign doesn’t have to be fully configured in Eloqua to integrate the Campaign ID with your Ignite Growth Platform campaign. In fact, it’s critical to do it before activating the campaign in Eloqua to ensure you get in-platform reporting like awareness and consideration conversions.
Birthday emails are a proven way to nurture or strengthen relationships with patients and consumers. They give you an opportunity to connect—be it to schedule an annual physical, educate on age-eligible screenings, or just making them feel valued. So how do you set up those campaigns in Eloqua? Let’s unwrap it!
- Sync all email addresses in Ignite Growth Platform to Eloqua to create a segment (removing hard bounces and opt-outs).
- In your multi-step campaign canvas, drag and drop the Compare Contact Fields option and have it look at “Contacts who have a birth date equal to today (No Year).”
- Based on the logic:
- For the checkmark (yes) side, add the email and it will be delivered if today is their birthday.
- For the X (no) side, add a Wait step, where people will be routed and cycled through until it’s their birthday.