Upload an external list to Eloqua
It's possible to upload lists directly to Eloqua as long as email addresses are included in the list. In addition to this "How-to", use the Eloqua Help Center documentation on creating segments and contact your WebMD Ignite team with any questions.
Please note that list members uploaded to Eloqua and used in Eloqua campaigns will not be available in Ignite Growth Platform for downstream reporting. These lists do not sync back to Ignite Growth Platform.
If you are interested in downstream reporting:
- Send the list to your Marketing Engagement Specialist to upload to Ignite Growth Platform
- Add to a target audience and campaign; sync it over to Eloqua from the Ignite Growth Platform campaign
Questions? Talk with your Account Manager or submit a support ticket.
Please note that all contacts on uploaded lists will automatically be set to ‘globally subscribed’, meaning their email addresses will be marked as solicitable for all Eloqua email groups.
Upload external lists to an Eloqua Segment
- Create your upload file (.txt, .csv, .xls, .xlsx).
- The upload file should only contain the contacts that you want to update and should only contain the information you want uploaded.
- Separate contact fields in a .csv or .txt file using a comma (,), pipe (|), or semicolon (;).
- The first row of the file must be column headings. Oracle Eloqua will attempt to map the headings to existing contact fields.
- Ignite Growth Platform's integration with Eloqua will only sync and master WebMD Ignite standard fields with Ignite Growth Platform. However, non-standard fields from a list uploaded to Eloqua can still be used in Eloqua for things like segmentation and dynamic content.
We recommend removing duplicates from the source list prior to uploading to Eloqua. It’s important to understand what's being imported and ensure data quality.
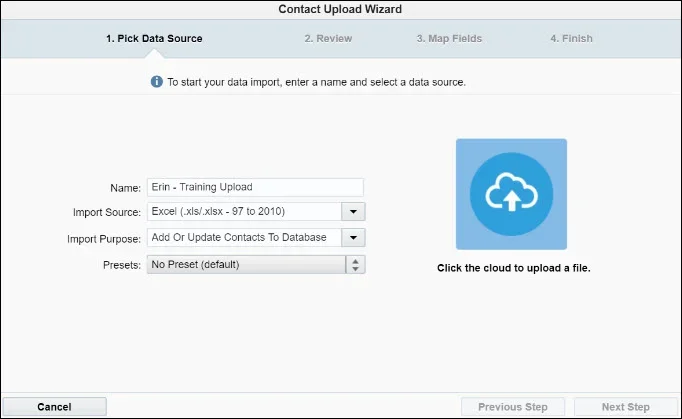
- In Eloqua, navigate to Segments > select Create a Segment (blank segment) > Upload Contacts from the + button to open the Contact Upload Wizard. Complete the information about the upload and choose your upload file.
- Be sure to use consistent naming conventions when prompted to enter a name for your upload. If there are any errors in the source list, Eloqua will alert you. For example, if there are missing or duplicate column headers - fix the errors in the file and upload again.
- Verify the contents of the file on the Review tab and click Next Step.
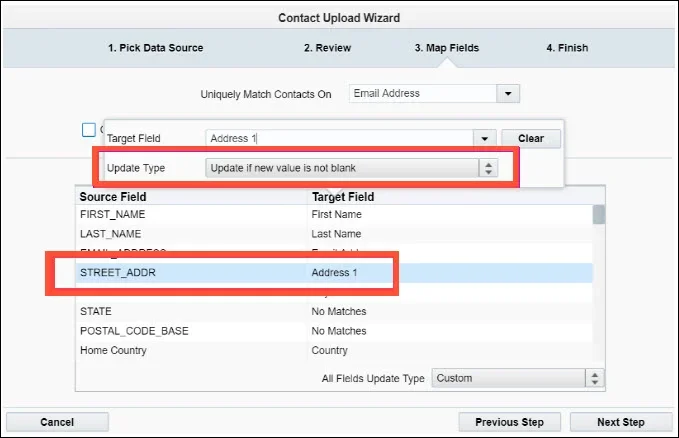
- Review the Map Fields window. If any of the import columns cannot be automatically mapped to an Eloqua field name, you will need to double click on the target field name to open the field selector box.
- For WebMD Ignite standard fields, you will need to map to the existing Eloqua field name (for example: First Name, Last Name, Address 1, State, Postal code, Home Phone, etc.). Once a field is selected for mapping, you will not be able to select it from the list again (to prevent duplication).
- For non-standard fields, assess whether they are truly something you will use in Eloqua. If they are, then you will need to create a Custom Object to house the field values prior to uploading your list (so it’s selectable when you are mapping list fields). For more information on Custom Objects, please reference the Oracle Help Center documentation and talk with your account management team.
- When selecting the All Fields Update Type, consider how you want Eloqua to import the data if it finds the email address already exists. Do you want each import field to have a Custom rule on when it writes data into Eloqua, or do you want all fields to have the same Update Type
- Consider the quality and recency of the data you are importing when selecting the Update Type. If your data is old or not of good quality you may choose to only update if the existing value is blank.
- Complete the final step of the wizard by confirming your email address. If you would like to save the contacts as a Shared List as well as in the segment, check the Place Contacts into a Shared Contact List box. This will allow you to choose what folder you want to save the list into or if you want to add the contacts to a previously created shared list. Once you are ready to load the list, click Finish.
- You'll receive an email notification when the list upload has completed processing. The email notification will contain information on the number of records uploaded, and any rejected records.
- Return to your segment >double-click on the segment name in the upper left corner and name your list segment > Click Save.
- Confirm the segment numbers match what you expected to import.
