Install capture script on landing pages
The WebMD Ignite capture script, also called “Orbit”, is an essential part of the tactics and tracking ecosystem that enables the comprehensive reporting in your platform. The script is typically installed as part of the platform implementation project but if, for some reason, you're not sure or want to confirm, you can following the steps below or submit a support ticket.
Once installed on your site, the script is used to:
- Populate hidden fields in the web form on your campaign landing page with data from the trackable URLs you created for your channels. In other words, it attributes incoming traffic from those sources (ads, email, direct mail, etc.) to your campaign.
- Append campaign data to any external links on the landing page to enable cross-domain tracking. For example: If a person comes into your landing page from an email, and the landing page then links out to a health risk assessment (HRA) hosted on a vendor site, the capture script will add the campaign data to that external domain. This tracks the HRA submission back to the original email that drove them to your landing page.
Install options and instructions
We recommend that the capture script is available on all public pages on your website and its subdomains. This can be achieved through Google Tag Manager, if available. Otherwise, most Content Management Systems (CMS) offer a method for installing content sitewide.
If this isn’t feasible, it should at minimum be installed on any landing pages where visitors could potentially enter the site from promoted channels as well as any tracking-enabled web form pages.
Google Tag Manager (If applicable)
- Click Tags in Google Tag Manager.
- Click New > Click in the middle to configure the new variable.
- In the next window under Custom, select Custom HTML.
- Paste the capture script code (below) into the HTML area.
- Save and give your tag a name and a trigger.
| <script async src="https://script-app.mercuryhealthcare.com/mhc-orbit-v1.0.min.js"></script> |
CMS
Each CMS will have a different process for including a script on a page or across the site. Consult with your web team to determine what options are available for including the Orbit tracking script on your website platform.
| <script async src="https://script-app.mercuryhealthcare.com/mhc-orbit-v1.0.min.js"></script> |
Eloqua landing page
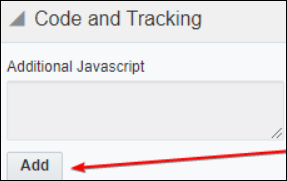
To include the capture script on a landing page in Eloqua, open the page settings and locate the Code and Tracking section where there is a text area to add Additional Javascript. Paste in the code below and save the page to install tracking.
function track() {
var script = document.createElement('script');
script.src = 'https://script-app.mercuryhealthcare.com/mhc-orbit-v1.0.min.js';
document.body.appendChild(script);
}
if (document.readyState === 'loading') {
document.addEventListener('DOMContentLoaded', track);
} else {
track();
}
}());
Confirm installation on a page
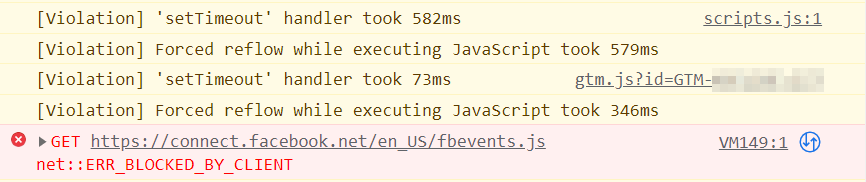
The capture script will display a short message in a browser’s web console indicating that it is present and running on a page.
To see the message:
- Navigate to the page to be checked.
- Open a web console (see how below).
- Find the Console tab if it’s not already selected
- Example: Chrome DevTools

- Look for the message, MHC Orbit v1.0 Loaded
-
Example:

There may be other messages that appear in the console as well. If any are concerning, consult with your web team. However, some warning messages are common and generally expected.
-
Example:
-
How to open a web console
Apple Safari
The console in Safari will need to be enabled in the settings before it can be opened for the first time.
- Go to Safari Menu > Preferences > Advanced Tab.
- Check the option to Show Develop menu in menu bar.
Once enabled, the console itself can be opened by the hotkey combo or by the menus.
- Mac
- Hotkeys: Option +⌘ + C
- Menus: Develop > Show JavaScript Console
Google Chrome
- Windows
- Hotkeys: F12 or Ctrl + Shift + J
- Menus: Chrome Menu > More Tools > Developer Tools
- Mac
- Hotkeys: Option + ⌘ + J
- Menus: Chrome Menu > More Tools > Developer Tools
Mozilla Firefox
- Windows
- Hotkeys: F12 or Ctrl + Shift + J
- Menus: Firefox Menu > More Tools > Browser Console
- Mac
- Hotkeys: Option + ⌘ + J
- Menus: Firefox Menu > More Tools > Browser Console
Internet Explorer / Microsoft Edge
- Windows
- Hotkeys: F12 or Ctrl + Shift + J
- Menus: Edge/IE Menu > More Tools > Developer Tools
- Mac
- Hotkeys: Option + ⌘ + J
- Menus: Edge/IE Menu > More Tools > Developer Tools
